

Although there are many alternatives to Google AdSense, it has remained the best contextual advertisement company for many years. No wonder AdSense is always considered first option for new bloggers.
Many bloggers make money from their blogs using AdSense—as it’s one of the easiest and most effective blog monetization strategies to put in place.
If you’ve recently started a blog and you want to apply for a Google AdSense account, this guide will show you how to do just that in very easy-to-follow steps.
The processes involved in signing up for Google AdSense is really easy. However, to get an approval for your blog, it has to be well developed and easy to navigate.
If your blog is not fully developed, then halt your application and develop your blog before applying.
I explained everything you need to do before applying for a Google AdSense account in my guide on how to quickly get Google AdSense approval on a new blog. However, I will still highlight a few of the basic requirements for creating an AdSense account.
The basic requirements for signing up for Google AdSense are:
- You must own a blog. If you don’t have one, follow this guide to start a WordPress blog or a free blog on blogger.
- You must be 18 years old or above. If not, get your parent or guardian to sign up on your behalf.
- Your website must be fully developed and contain original contents.
- Your website must not violate Google AdSense program policy.
If you/your website meet the above conditions, then we can get started with the processes involved in signing up for a Google AdSense account.
The steps involved in Signing up for Google AdSense are:
- Register for your AdSense account.
- Add Google AdSense verification code to your blog.
- Wait for a manual review and feedback.
How to create an AdSense account
To create an AdSense account, you need a Gmail account. So, If you don’t have one, then go ahead and create one before proceeding with your application.
Step 1: Visit the AdSense signup page and enter your website URL and email address.
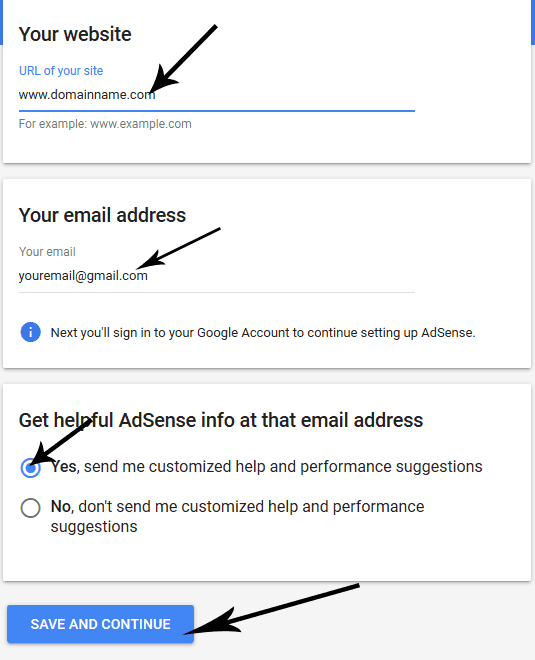

Enter all the required information, select either Yes or No for “Get helpful AdSense info at that email address” and click “SAVE AND CONTINUE”.
Step 2: Select your country or territory
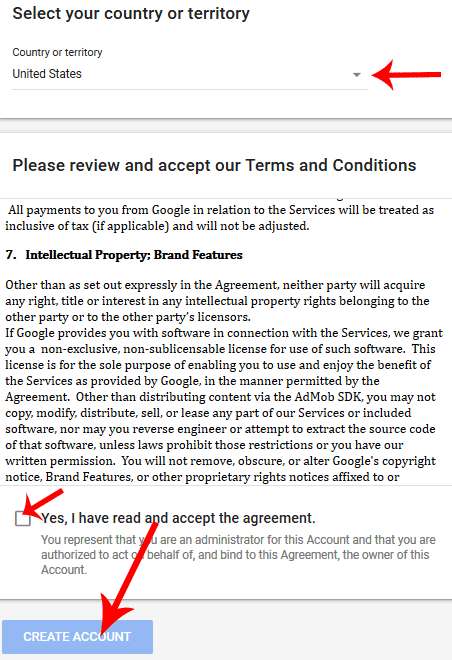

After selecting your country, you will get Google AdSense agreement. After reading, select “Yes, I have read and accept the agreement and click on “CREATE ACCOUNT”.
Step 3: Add your mailing address and phone number.
This should be done with caution. Make sure your mailing address and payee name is exact. Do not try any variation while do this, you may find it difficult to correct it in the future.
In fact, some countries do not permit a change of payee name after sign up, so your payee name must be entered without any form of error.
Step 4: Add AdSense code to Website


This is the final step for your AdSense sign up. You need to copy this AdSense code and add it to your website.
First, click on “Copy Code” add the code to your website, go back to your AdSense page, select both options that say – Show ads as soon as my account is activated and I’ve pasted the code in my site. Click on Done.
After performing all those actions, your website will be reviewed. Your AdSense application will either get rejected or approved.
I do hope your account gets approved on your first trial. However, I have to admit, that’s not always the case. If your application gets rejected, you can have a look on our guide that will help you understand and correct AdSense rejection messages.
If you faced any issue during sign up, feel free to get in touch with me using the comment section.
Connect with us on Facebook, Twitter and YouTube to get access to tutorials faster than anyone else.


I first time visite your website come.And after reading these posts I understand the good,And I hope you will share another post about it soon.
Please I deleted all the attached to my code and pasted in my wigdets, custom HTML because my site is WordPress.com and I’m on a premium plan so I can’t download headers and footers plugins and saving the code wouldn’t work until you delete all the attached. Though AdSense said code was zees on my site but I’m afraid if this this will affect my application because I haven’t heard from them after the application. Thanks. Please help me.
In as much as the code appears on your site, then AdSense should be able to inspect your site and get back to you. Just wait patiently.
Thanks for your help. I just applied today, in the morning and the problem I had was that I use a WordPress.com hosting with a premium plan and here you can’t download headers and footers plugins until u upgrade to business plan so I had to go to widget in my dashboard, then to footers menu and Custom HTML and pasted the code but it didn’t work and it was telling me unacceptable so I deleted all the attached to the code and saved and it published. When I went to my AdSense account and checked the boxes as done, it said the code was seen on my website. I’m afraid if those I deleted will affect my application process. Thanks. Please respond.
If I get reject on first try then I have to paste code again ??? On my blog on HTML head?
If you’re reapplying with the same email account, then you don’t have to paste a new code. If you need to paste a new code, Google will notify you about it and generate a new code for you.
Is it true that my blog has to stay 6 months before making application for adsense or based number of page view. Most grateful.
It is not true that your blog must be 6 months old, and it doesn’t matter if you’re getting large traffic or small traffic. All you need is a quality blog design and original content. Read my AdSense Frequently asked questions and answers to discover more.
Thanks for ur advice. Pls kindly drop your nomba ASAP. We need to talk. tnx